前期已经已经讲解过如何在服务器安装nginx、mysql、php。
现在我们将新的站点准备存在 /home/wwwroot下面,所以要在/home下面新建一个这样的目录:
[root@localhost ~]# mkdir /home/wwwroot现在上述三个软件的安装目录均在:/usr/local 的目录,下面进入该目录下的nginx文件目录:
[root@localhost ~]# cd /usr/local/nginx查看下里面有哪些目录:
[root@localhost nginx]# ls结果如下图:
接着进入到conf文件,这是存放nginx配置文件的目录:
[root@localhost nginx]# cd conf在里面新建一个名为vhost的文件夹:
[root@localhost nginx]# mkdir vhost假如我们要新建站点的域名为:a.demo.com,则我们需要在vhost文件夹里面新建关于这个域名的配置文件。我这里命名为a_demo_com.conf(前提是你已经申请了这个域名,并解析到了这台服务器的IP上面):
[root@localhost nginx]# cd vhost
[root@localhost vhost]# vim a_demo_com.conf
然后进入编辑页面,按i键开始 Insert【插入】编辑:
粘贴复制一下配置文件代码到a_demo_com.conf中,然后修改 端口【listen】、域名【server_name】、root【网站存放的目录】等相关信息。
注:我这里是存放在 /home/wwwroot这个目录下面:
server {
    listen      80;
    server_name  a.demo.com;     //重要 你的域名
    #charset koi8-r;
    #access_log  logs/host.access.log  main;
    location / {
        root   /home/wwwroot;  //定位到的项目地址
        index  index.php index.html index.htm;
        if (!-e $request_filename) {
        rewrite  ^(.*)$  /index.php?s=$1  last;
        break;
        }
    }
location ~ \.php?.* {
        root           /home/wwwroot; //定位到的项目地址
        fastcgi_pass   127.0.0.1:9000;
        fastcgi_index  index.php;
        fastcgi_param  SCRIPT_FILENAME  /scripts$fastcgi_script_name;
        include        fastcgi_params;
        set $path_info "";
        set $real_script_name $fastcgi_script_name;
        if ($fastcgi_script_name ~ "^(.+?\.php)(/.+)$") {
        set $real_script_name $1;
        set $path_info $2;
        }
        fastcgi_param SCRIPT_FILENAME $document_root$real_script_name;
        fastcgi_param SCRIPT_NAME $real_script_name;
        fastcgi_param PATH_INFO $path_info;
       }
    #error_page  404              /404.html;
    # redirect server error pages to the static page /50x.html
    #
    error_page  500 502 503 504  /50x.html;
    location = /50x.html {
        root  html;
    }
    # proxy the PHP scripts to Apache listening on 127.0.0.1:80
    location ~ \.php$ {
        proxy_pass   http://127.0.0.1;
    }
    # pass the PHP scripts to FastCGI server listening on 127.0.0.1:9000
    location ~ \.php$ {
        root          html;
        fastcgi_pass   127.0.0.1:9000;
        fastcgi_index  index.php;
        fastcgi_param  SCRIPT_FILENAME  /scripts$fastcgi_script_name;
        include        fastcgi_params;
    }
    # deny access to .htaccess files, if Apache's document root
    # concurs with nginx's one
    #
    #location ~ /\.ht {
    #    deny  all;
    #}
}
更改完成后按 [ESC]退出编辑模式,再按 [:wq]保存并退出文档,此时就在vhost的目录下面新建了一个网站配置文件a_demo_com.conf就算配置好了。
紧接着进入conf文件夹,准备对nginx的配置文件进行设置,在原先的nginx的配置文件中增加多站点配置,方法为:
[root@localhost vhost]# cd ..
[root@localhost conf]# vim nginx.conf
然后按i键开始 Insert【插入】进入编辑页面,
找到http{…}包含的位置,在最后面加上一行如下代码:include /usr/local/nginx/conf/vhost/*.conf;
http {
 ..................中间代码省略..................
include /usr/local/nginx/conf/vhost/*.conf; #此处为添加的代码 在http{}的最后一行上面
 }
该条代码的意思就是把/usr/local/nginx/conf/vhost/目录下的所有.conf后缀的多站点配置文件都包含进来,使配置文件生效。
更改完成后按 [ESC]退出编辑模式,再按 [:wq]保存并退出文档,此时就在nginx.conf文件就配置好了。
下面重启nginx,使配置文件生效。
[root@localhost conf]# /etc/rc.d/init.d/nginx restart如没有报错正常重启完成之后,进入到我们的新网站根目录:
[root@localhost conf]# cd /home/wwwroot我们新建一个测试页面:
[root@localhost wwwroot]# vim index.php然后按i键开始 Insert【插入】进入编辑页面,输入:<?php phpinfo(); ?>
更改完成后按 [ESC]退出编辑模式,再按 [:wq]保存并退出文档。
再回到/home目录下面,给wwwroot文件夹配置用户及用户组权限:
[root@localhost wwwroot]# cd ..
[root@localhost home]# chown -Rf www:www /home/wwwroot
[root@localhost home]# chmod -Rf 755 /home/wwwroot
至此全部配置完毕!
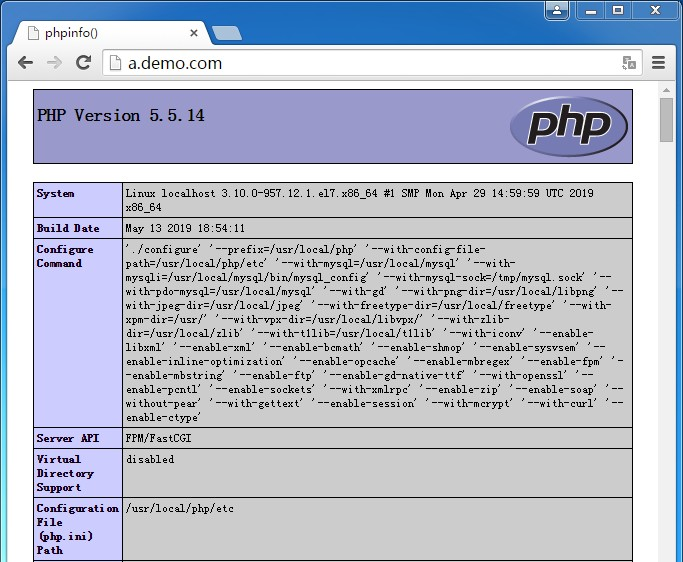
然后在浏览器输入:http://a.demo.com就应该能显示php的配置信息了,如下图:
这样整个操作过程结束!